Go back one page in the scenario Go to Tutorial Home Page Go forward one page in the scenario
topic links | tutorial home | scenario home | e-mail support

Scenario: Getting Started with Intraspect
Go to Scene 1: Getting Started with Intraspect Go to Scene 2: A valuable e-mail Go to Scene 3: Collecting e-mail Go to Scene 4: Logging in to Intraspect Go to Scene 5: First look at Intraspect Go to Scene 6: E-mail collection results Go to Scene 7: Preparing for Web page collection Go to Scene 8: Collecting a Web page Go to Scene 9: Collecting an excerpt Go to Scene 10: Collecting from the file system Go to Scene 11: Re-docking the Collection Bin Go to Scene 12: Viewing collected e-mail Go to Scene 13: Viewing cover pages Go to Scene 14: Viewing Web objects Go to Scene 15: Viewing excerpts Go to Scene 16: Viewing binary documents Go to Scene 17: Viewing objects immediately Go to Scene 18: Private Workspace Go to Scene 19: Creating new folders Go to Scene 20: Collecting from the Collection Bin into folders Go to Scene 21: Changing the current context Go to Scene 22: Using the Context Selector Go to Scene 23: Making private information public Go to Scene 24: Adding comments Go to Scene 25: Setting up a discussion Go to Scene 26: Discussion e-mail addresses Go to Scene 27: Adding Intraspect recipients to a discussion Go to Scene 28: Adding non-Intraspect recipients to a discussion Go to Scene 29: Sending messages to a discussion Go to Scene 30: E-mail participation in discussions Go to Scene 31: Observing a discussion inside of Intraspect Go to Scene 32: Accessing Intraspect using a Web browser Go to Scene 33: Reply to a discussion from a browser Go to Scene 34: Find a new message in the discussion Go to Scene 35: Submitting a Search Go to Scene 36: Reviewing Search results Go to Scene 37: Displaying the contents of Search hits Go to Scene 38: End of Scenario I
33 of 38


33: Reply to a discussion from a browser

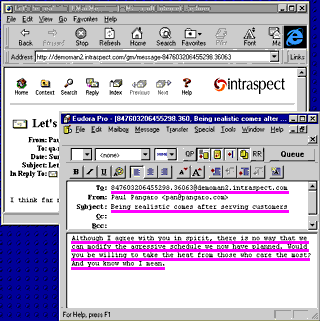
You can also reply to a discussion from your browser by using the Reply button in the browser window

Browser invokes e-mail client for discussion response
  1. Choose the Reply button from the toolbar inside the browser display window. Your e-mail client displays a new message with the To: field addressed to the discussion. Refer to screen shot
  2. In the Subject field, enter the essence of your reply; enter your full reply as the body of the message. Refer to screen shot
  3. Send the message.

previous next

Related Topics