Go back one page in the scenario Go to Tutorial Home Page Go forward one page in the scenario
topic links | tutorial home | scenario home | e-mail support

Scenario: Getting Started with Intraspect
Go to Scene 1: Getting Started with Intraspect Go to Scene 2: A valuable e-mail Go to Scene 3: Collecting e-mail Go to Scene 4: Logging in to Intraspect Go to Scene 5: First look at Intraspect Go to Scene 6: E-mail collection results Go to Scene 7: Preparing for Web page collection Go to Scene 8: Collecting a Web page Go to Scene 9: Collecting an excerpt Go to Scene 10: Collecting from the file system Go to Scene 11: Re-docking the Collection Bin Go to Scene 12: Viewing collected e-mail Go to Scene 13: Viewing cover pages Go to Scene 14: Viewing Web objects Go to Scene 15: Viewing excerpts Go to Scene 16: Viewing binary documents Go to Scene 17: Viewing objects immediately Go to Scene 18: Private Workspace Go to Scene 19: Creating new folders Go to Scene 20: Collecting from the Collection Bin into folders Go to Scene 21: Changing the current context Go to Scene 22: Using the Context Selector Go to Scene 23: Making private information public Go to Scene 24: Adding comments Go to Scene 25: Setting up a discussion Go to Scene 26: Discussion e-mail addresses Go to Scene 27: Adding Intraspect recipients to a discussion Go to Scene 28: Adding non-Intraspect recipients to a discussion Go to Scene 29: Sending messages to a discussion Go to Scene 30: E-mail participation in discussions Go to Scene 31: Observing a discussion inside of Intraspect Go to Scene 32: Accessing Intraspect using a Web browser Go to Scene 33: Reply to a discussion from a browser Go to Scene 34: Find a new message in the discussion Go to Scene 35: Submitting a Search Go to Scene 36: Reviewing Search results Go to Scene 37: Displaying the contents of Search hits Go to Scene 38: End of Scenario I
23 of 38


23: Making private information public

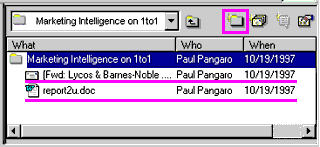
Assume that the objects that you have collected are of value to your colleagues

Intraspect provides you with a Public Folder for collecting the objects that you want to share.

Control-drag moves a copy of the dragged object
  1. Click on the Public Folder button in the Main Toolbar. Refer to screen shot
  2. Choose the New Folder button on the Action Toolbar at the top of the Context Pane, and give the folder a title and a description as before. The new folder appears in the Context Pane inside your Public Folder.
  3. Identify the objects that you want to share, in preparation for copying them from the Collection Bin into your new folder.
  4. Following the Windows convention for copying, hold down the control key while dragging each object onto the new folder. The objects are copied into the new folder, while remaining in the Collection Bin. (To move an object from your Collection Bin into your Public Folder, simply drag it without using the control key.) Observe the changes to the Context Pane. Refer to screen shot
  5. Double-click on the new folder to view the objects in the Context Pane.

The objects that you have collected now appear in your Private Folder for your use, and in your Public Folder for your colleagues' use
previous next

Related Topics